

Macros allow you to easily automate repetitive Microsoft Excel tasks, freeing up your time for more important activities, ensuring consistency, and improving your efficiency. Whether you're creating financial reports or managing data, learning how to run macro in Excel will improve your productivity and make your job easier!
For example, if you often apply a particular format to a range of cells, you can create a macro that performs the formatting task with the click of a button. Or perhaps there is a set of headings you use often in your worksheets. After creating the appropriate macro, a click of a button will insert these headings anywhere in your workbook. In short, macros should be every accountant's best friend.
To help you get started, we're providing a guide to macros in Excel, including how to record a macro in Excel, run them, and use relative references. If you have issues with your macro, we'll also provide troubleshooting tips.
Please note, while you can accomplish a lot with recorded macros, many macros cannot be recorded and must be created using the Excel Visual Basic for applications (VBA) programming language. We'll also cover how to view the VBA code underlying the macro.
Summary
The quick steps to record a macro in Excel are:
- Start recording
- In the Developer tab, click on the Record Macro button to open the dialog box.
- Set up the macro
- Give it a descriptive name
- Assign a shortcut key - you'll use CTRL before the shortcut key to run the macro so avoid overwriting an existing shortcut
- Choose where to save the macro in Excel (the default is the current workbook you have open)
- Add a clear, but short description of what your macro does
- Perform the action
- Perform the actions in Excel you want to automate with your macro. Excel will record each step.
- Stop recording
- In the developer tab, click Stop Recording in the Code group.
Get the more in-depth walk-through with screenshots and steps below!
What are macros in Excel?
Macros in Excel refer to a set of instructions that automate tasks. These instructions are recorded, saved, and executed in VBA (Visual Basic for Applications) and can perform actions like formatting cells, creating charts, and much more. A macro can be run as many times as needed, so it is especially beneficial when dealing with repetitive tasks, making workflows more efficient and less prone to error.
How to run a macro in Excel
Now, we're going to walk you through how to record, write, and run macros in Excel.
Adding the Developer tab
To create or run macros in Excel you need to access the Developer tab on the ribbon. If the Developer tab does not appear on the ribbon proceed as follows:
- From the File tab click on Options.
- In the left pane of the Excel Options dialog box, click Customize Ribbon.
- Select the Developer check box in the pane on the right (see Figure 1). Then click OK.
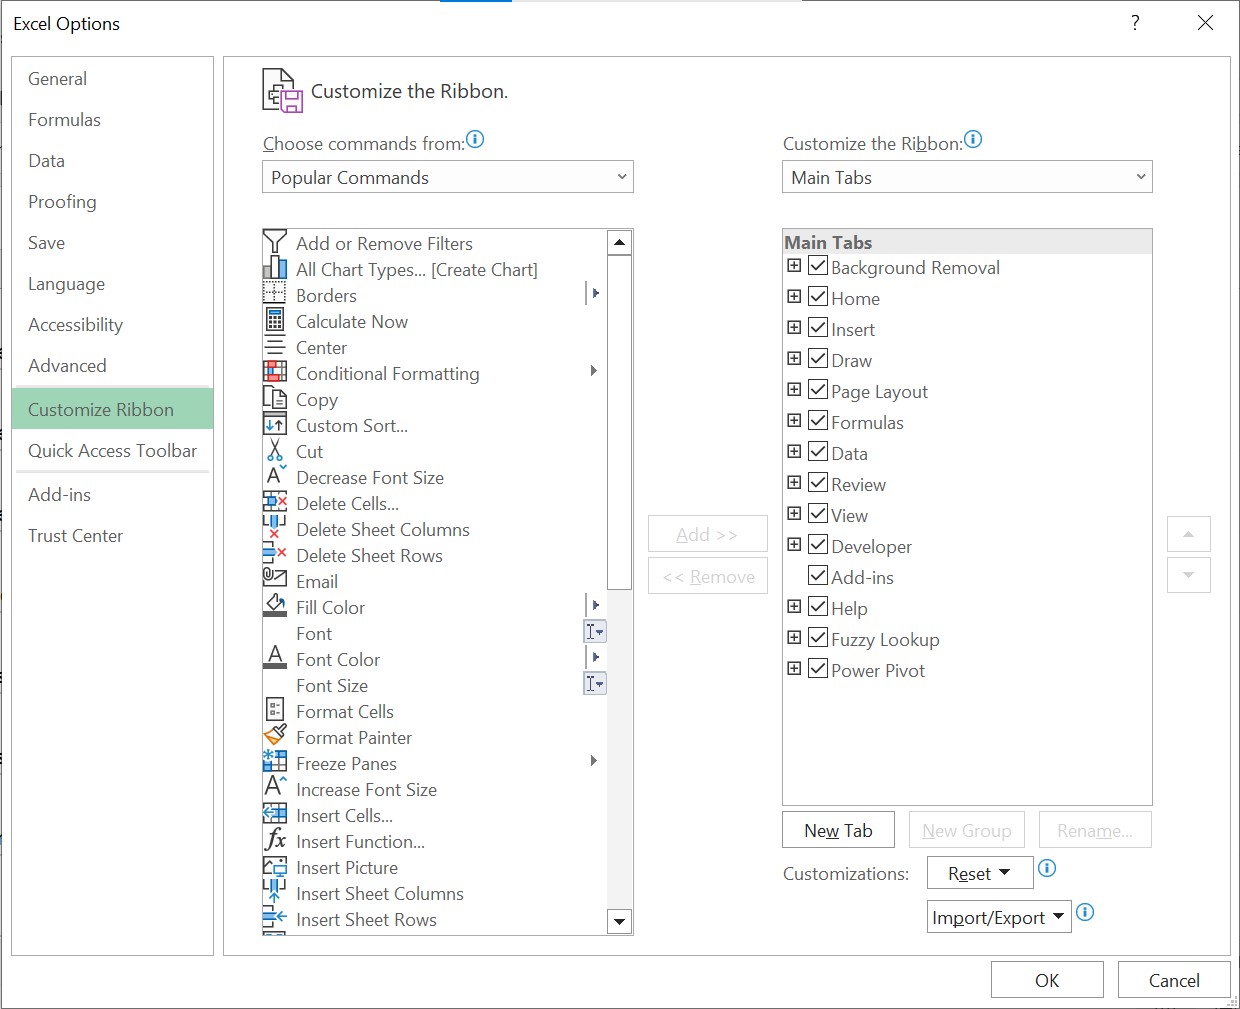
Figure 1: Adding the Developer tab to the ribbon
How to record macros in Excel
To record a macro, proceed as follows:
- After clicking the Developer tab, you will see the options shown in Figure 2.

Figure 2: The Developer tab
- In the Code group on the Developer tab, click the Record Macro button. Alternatively, click the Ready icon in the lower-left corner of your screen. The Record Macro dialog box (see Figure 3) opens.
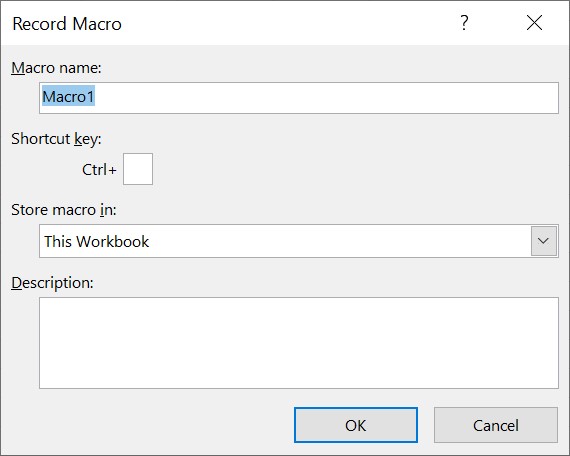
Figure 3: The Record Macro dialog box
- In the Macro Name box, replace the default name with one that’s more descriptive.
- If you want to use a shortcut key to run your macro, enter the key you want to use in the Shortcut Key box. A shortcut key is a sequence of keystrokes that can be used to run the macro. For example, if you enter Shift+F, then pressing Ctrl+Shift+F will cause your macro to run. When assigning a shortcut key, make sure you don’t choose one that’s already used to perform a task. For example, since Ctrl+B applies bold font, you cannot assign that shortcut key to your macro.
- By default, Excel stores the macro in the current workbook, making it available to run whenever the workbook is open. If you want your macro to always be available no matter what workbook you’re using, open the Store Macro In the drop-down list and select Personal Macro Workbook.
- Optionally, type a description of the macro in the Description box. Then click OK.
- Perform the steps you want to repeat when you run the macro.
- In the Code group on the Developer tab, click the Stop Recording button. Alternatively, click the small gray rectangle that appears in the lower left-hand corner of your screen under the worksheet tabs.
Recording and running your first macro
Now that you know the steps, let's look at an example of how to run a macro in Excel.
Suppose your work often requires you to highlight numerical data in a bold red font. Let’s record a macro in Excel to automate this task. Note that workbooks containing macros need to be saved in the .xlsm format.
To create and run this macro proceed as follows:
- In the Code group on the Developer tab click Record Macro.
- Fill in the Record Macro dialog box as shown in Figure 4. Then click OK.
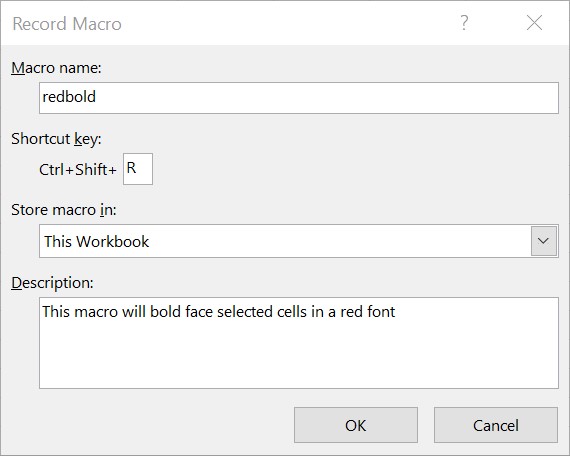
Figure 4: Settings for the redbold macro
- Press Ctrl+1 to open the Format Cells dialog box.
- Click the Font tab, choose Bold in the Font Style list, and select a shade of red under Color. Then click OK.
- Click Stop Recording.
- Because the workbook contains a macro, save the workbook file as an Excel macro-enabled workbook. The workbook’s name is now Redbold.xlsm. The suffix .xlsm indicates the file is a macro-enabled workbook.
- Test the macro by entering data in cells J5:J7. After selecting J5:J7 and pressing Ctrl+Shift+R, cells J5:J7 will be formatted in a red font and bolded.
How to use a button to run macros in Excel
You can run your macro shortcut more conveniently by creating a button. Here's how:
- In the Controls group on the Developer tab, click the Insert button. Then, choose the Button option from the Forms Control palette that appears.
- Click the spot in your worksheet where you want to create the button, and then drag until the button is the size and shape that you want.
- When you release the mouse button, the Assign Macro dialog box opens (see Figure 5). In the Macro Name box, select the redbold macro that we previously created and click OK.
- To test the button, enter some data, select it and click the button. The new data should be formatted in a bold red font.
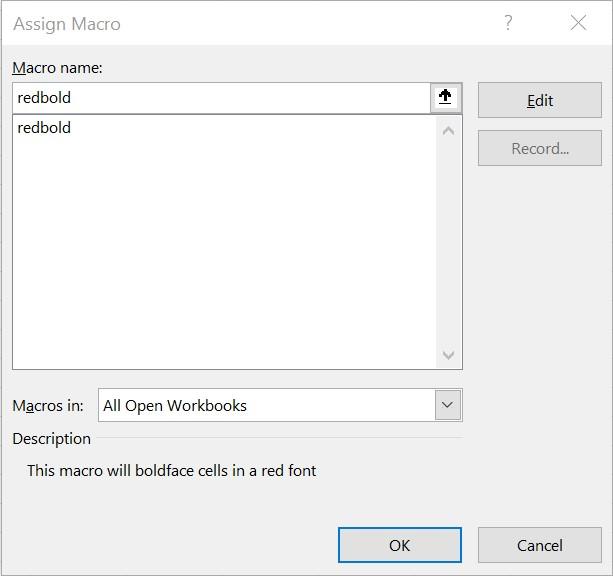
Figure 5: Creating a button to run macros in Excel
How to view the VBA macro code
When you record macros in Excel, you can later view it as VBA code. Here's how to view your macro's VBA code:
On the Developer tab, select Macros from the Code group.
Select your macro, in this case redbold, then select Edit. You should see the code pictured in Figure 6.
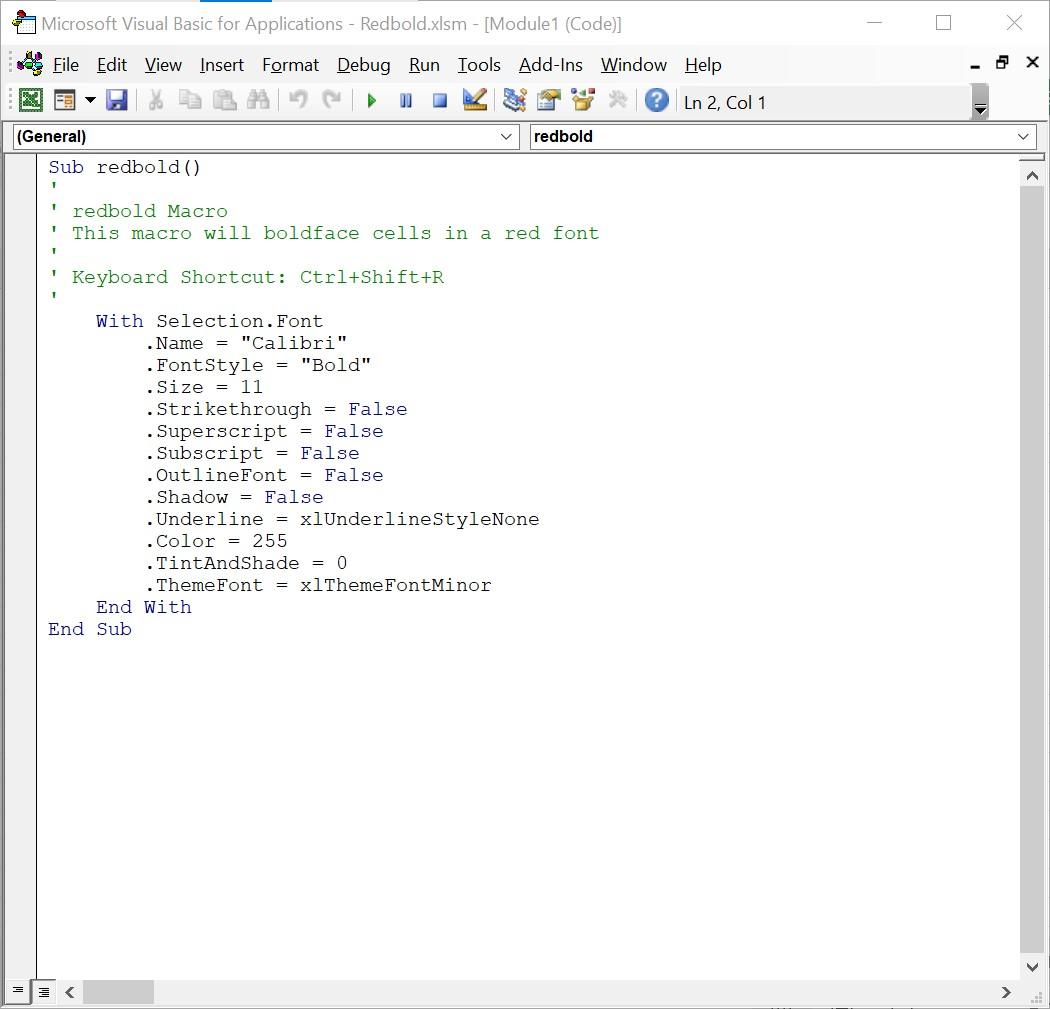
Figure 6: Redbold macro VBA code
Please note the following:
A macro must begin with a statement that contains “Sub” followed by the name of the macro and (). For example, Sub redbold().
A macro must end with an End Sub statement.
- Any statements beginning with ‘ are simply comments.
All statements containing the word False are redundant and unnecessary. The other statements such as .Fontstyle=”Bold” instruct Excel to change the format of the selected range.
Download our FREE ebook Excel automation for accountants
With step-by-step tutorials and real world examples, learn valuable automation functions in Excel that save time, improve accuracy, and and enhance your skills!
How to create macros in Excel using relative references
Sometimes you may want the location where your macro performs its magic to depend on the active cell. You can do this with relative references. Here is how to record a macro using relative references:
In the Code Group section of the Developer tab, enable the Use Relative References option.
Once Use Relative References is enabled, each macro that you create will only contain references to the cell that you selected before you record the macro in Excel. During the execution of the macro, all keystrokes will be executed relative to the currently active cell.
How to run a macro in Excel using absolute and relative references
There may be instances where you need a macro that uses both absolute and relative references. Here is an example.
Figure 7 shows the sales of three products last year and this year. You want to record a macro that computes each product’s change in sales, places a red border around all your data and ends in cell E1. The macro should work even if there are fewer or more than three products.

Figure 7: Starting sales data
Here’s how to create a macro with absolute and relative references:
Select any cell in the workbook.
In the Code Group section of the Developer tab, make sure the Use Relative Reference option is unselected.
Click the Record Macro button.
In the Record Macro dialog box, type “changerel” in the Macro Name box. Enter Ctrl+Shift+R as the shortcut key. Choose to store the macro in the current workbook and click OK.
Click cell D1 and type “change”. This will be the heading for the column that contains the change in sales.
Click cell D2, type the formula “=C2-B2" and press Ctrl+Enter to leave the current cell selected.
Press Ctrl+C to copy the formula in cell D2.
Select cell C2.
Press Ctrl+down arrow to move to the bottom of column C. That way, even if you change the number of products, this step will end at the bottom of your data.
In the Code group on the Developer tab, deselect the Relative References option.
Move one cell to the right and press Ctrl+shift+up arrow to select every filled cell in column D, except for cell D1.
Press Ctrl+V to paste the formula in cell D2 to every cell in column D. That way, even if you change the number of products, this step will copy the formula in cell D2 to the last row of product data.
In the Code group on the Develop tab, deselect the Relative References option.
Press Ctrl+* to select all your data (currently cells A1:D4).
Click the Home tab. Then the Font group. Click the Border button and choose More Options.
The Format Cells dialog box opens with the Border tab displayed. Select the settings shown in Figure 8 and select OK. These settings will create a bold red border around the selected cells.

Figure 8: Border settings for macro
Click cell E1. Then click the Stop Recording button in the Code group on the Developer tab.
To test the macro, delete the contents of D1:D4. Then, select a cell and press Ctrl+Shift+R to run the macro. The final result is shown in figure 9. If you were to add or delete products from the data set, the macro still works.

Figure 9: Final results of the macro
Troubleshooting macros in Excel
Recently, Office 365 made it more difficult to run a macro in Excel. If you open a .xlsm file and see the message shown in Figure 10, follow these instructions:
- Close the file and find it in File Explorer.
- Right-click the file and choose Properties.
- From the bottom of the General Tab check Unblock.
You should now be able to run the Macro.
![]()
Figure 10: New message indicating your macro is untrusted
Common uses for macros in Excel
There are so many macro use cases, but let's look at some of the basic ones that nearly all accountants can use.
- Cleaning data
- Generating reports
- Creating custom-functions
Learn more with Excel CPE
Excel offers a wide variety of functions, formulas, and automation that can save you hours of work while improving accuracy and outcomes. To help you make the most out of this software, we offer a wide variety of CPE courses to support your learning!
Check out Becker's wide range of CPE courses that teach you to make the most of this powerful tool:
- Excel: Technical Analysis Trading Strategies
- Excel: Enterprise Risk Management
- Excel: Magic with Excel
- Excel: Solve Hard Problems in Corporate Finance
- Excel Metrics: Best Practices
- Python for Excel Users: A Gentle Introduction
These and many more Excel-focused, CPE credit-earning courses are included in Becker's Prime CPE subscription. Sign up now for 12 months of access to over 1700 on-demand, webcast, and podcast CPE courses!
Unlock Unlimited CPE with a Prime Subscription
Becker makes it easy to meet your CPE requirements, gain new skills, and stay aware of critical updates and changes in the industry!
With Prime, you can access over 1,700 courses for a full year and earn unlimited CPE credits.